The Canyons Endurance Runs™ by UTMB®Auburn, United States🇺🇸

About The Canyons Endurance Runs™ by UTMB® 2027
The Canyons Endurance Runs™ by UTMB® 2027 is a trail race held from Thu, Apr 22, 2027 to Sun, Apr 25, 2027 in Auburn, United States; the start is at 12:00.
Registration is open; the deadline is Sun, Apr 18, 2027. Dates, registration windows and fees on this page are refreshed every morning by scanning federation, timing and organiser sites; registration always happens on the official race site.
Someone running 30 km a week needs 27 weeks, about 6 months, to prepare for the 161K course of The Canyons Endurance Runs™ by UTMB® 2027; the latest start is Thu, Oct 15, 2026.
The Canyons Endurance Runs by UTMB® starts in the historic gold-rush town of Auburn, birthplace of mountain ultras, located in the northern California foothills of the Sierra Nevada range. This race is a qualifier for the iconic UTMB World Series Finals and the Western States Endurance Run. In addition, the Canyons 100K distance is a Western States 100 Super Golden Ticket race in which the top three female and male finishers earn direct entry to The Western States Endurance Run.
Courses
| Course | Distance | Elevation Gain | Km-effort | Course file |
|---|---|---|---|---|
| 161K | 161 km | 5550 m D+ | 217 | GPX |
| 100K | 100 km | 3750 m D+ | 138 | GPX |
| 50K | 50 km | 1700 m D+ | 67 | GPX |
| 25K | 25 km | 850 m D+ | 34 | GPX |
There are 4 courses: 161K (5550 m D+); 100K (3750 m D+); 50K (1700 m D+); 25K (850 m D+).
Course map and elevation profile
What the weather is usually like here
- Over the last 5 years this week typically ran 0°C to 13°C here, with a high of 21°C and a low of -5°C.
- 29% of those days saw rain. A real forecast lands about two weeks out and will appear here then.
- Typical daily maximum wind was 13 km/h (a light breeze), with 20 km/h the highest value in the sample.
- Sunrise 06:15, sunset 19:47.
The race is more than two weeks out, so these are averages of recent years for the same week, not a forecast. A real forecast appears here closer to the day.
Race briefing
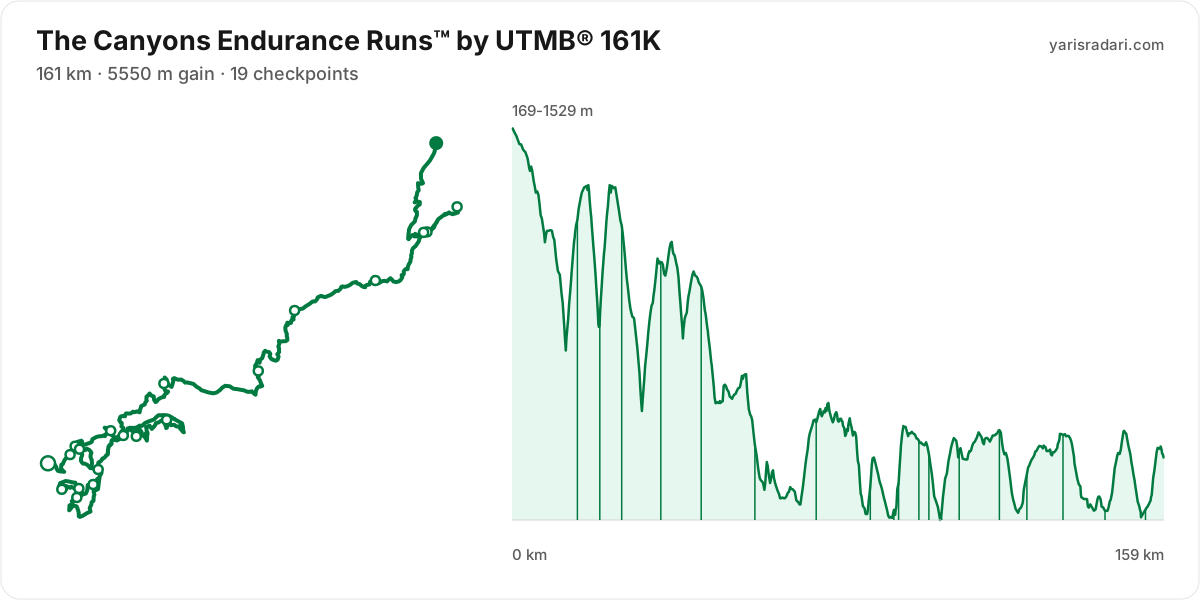
161K course159 km · 5492 m gain · 27% uphill · 19 aid stations
- Steep climb (10%+)
- Climb (3-10%)
- Flat
- Descent
- Steep descent (12%+)
The published GPX measures 159 km with 5492 m of climbing, 35 m per km. The course sits between 160 m and 1529 m of altitude. 56% of the gain sits in the first half.
- 0-16 km · Start → Deadwood - 1: 550 m up / 880 m down; the stretch descends.
- 16-21 km · Deadwood - 1 → Swinging Bridge - Turnaround: 205 m up / 537 m down; the stretch descends.
- 21-27 km · Swinging Bridge - Turnaround → Deadwood - 2: 501 m up / 191 m down; the stretch climbs.
- 27-36 km · Deadwood - 2 → Michigan Bluff: 557 m up / 672 m down; the stretch keeps rolling.
- 36-46 km · Michigan Bluff → Foresthill: 351 m up / 431 m down; the stretch keeps rolling.
- 46-59 km · Foresthill → Cal 2: 238 m up / 780 m down; the stretch descends.
- 59-74 km · Cal 2 → Drivers Flat: 520 m up / 451 m down; the stretch keeps rolling.
- 74-87 km · Drivers Flat → Mammoth Bar: 405 m up / 629 m down; the stretch descends.
- 87-93 km · Mammoth Bar → Confluence: 164 m up / 251 m down; the stretch keeps rolling.
- 93-99 km · Confluence → Cool - 1: 352 m up / 105 m down; the stretch climbs.
- 99-101 km · Cool - 1 → Coffer Dam - 1: 12 m up / 57 m down; close to flat.
- 101-105 km · Coffer Dam - 1 → HiddenLoopPoint: 51 m up / 232 m down; the stretch descends.
- 105-109 km · HiddenLoopPoint → Coffer Dam - 2: 265 m up / 74 m down; the stretch climbs.
- 109-119 km · Coffer Dam - 2 → Cool - 2: 213 m up / 147 m down; gently rolling.
- 119-125 km · Cool - 2 → Browns Bar - 1: 162 m up / 317 m down; the stretch descends.
- 125-134 km · Browns Bar - 1 → ALT: 246 m up / 102 m down; gently rolling.
- 134-144 km · ALT → Browns Bar - 2: 125 m up / 394 m down; the stretch descends.
- 144-154 km · Browns Bar - 2 → No Hands - 2: 337 m up / 332 m down; the stretch keeps rolling.
- 154-159 km · No Hands - 2 → Finish: 239 m up / 53 m down; the stretch climbs.
The first 5 km drop 159 m. Fresh legs make it feel free, but you climb every metre of it back.
The steepest wall stands between km 21 and km 25: 494 m over 3.4 km at 15% average, its steepest roughly 250 m section averaging 27%. Kilometre by kilometre: km 22 193 m, km 23 182 m, km 24 131 m, km 25 26 m. Running is off the table only in the steepest roughly 250 m core; hike that part with short steps and run again once the grade eases.
The backbone of the course runs from km 32 to km 39: net 584 m over 7 km at 8% average, its steepest roughly 250 m section averaging 20%, 663 m of climbing in total with 79 m given back. Kilometre by kilometre: km 33 172 m, km 34 129 m, km 35 104 m, km 36 66 m, km 38 60 m, km 39 57 m. This is hiking terrain, not running terrain. Walk it with intent and keep your heart rate off the ceiling.
The longest descent starts at km 0 and loses 755 m by km 13 at 6% average, its steepest roughly 250 m section averaging 24%. Its length can load the quads, so begin under control and build rhythm only when the ground and visibility allow it. The drop at km 18 averages 29% over its steepest roughly 250 m section; shorten the stride, stay balanced and set speed to the ground instead of braking continuously.
The last 6 km climb 226 m to the line. Know it going in and save something for it.
You reach the climb after Swinging Bridge - Turnaround with about 537 m of descent already in your quads; treat its first half as recovery effort.
The leg from Cal 2 to Drivers Flat is long and unsupported: 15 km and 520 m of climbing with no aid in between, so leave Cal 2 with full capacity.
- The organiser lists 161 km; the published GPX measures 159 km. The technical course notes use the published GPX measurement.
- Sunset is 19:47 and the finish cut-off is 23:00. A runner using the full time allowance spends the final 10 hours 28 minutes in darkness.
- Get the headtorch out before sunset and keep spare batteries or a power bank dry and immediately accessible. A spare buried at the bottom of the pack is not an emergency spare.
- Check reflective course markers regularly in the dark. If the markings disappear, stop moving forward, return to the last marker and confirm the route against the GPX or organiser app.
- At cut-off pace you run into a second night. Plan the sleep question before race day: an hour gained on the first night costs two on the second.
- Consider bringing poles. The course averages 35 m of gain per km and the longest climb averaging over 5% runs 7 km; if you have trained with them and the organiser allows them, use them on the climbs and stow them on runnable ground.
- Point to point: the finish sits 44.1 km from the start as the crow flies. Sort the shuttle and your drop bag before race day.
- Km 21.4 to 24.3 is the same ground you covered at km 20.9; note your pace on the first pass and use it as the yardstick on the second.
Course-profile notes are generated from GPX grade data; terrain, rules, aid stations and weather are added only when separately sourced.
Aid stations
Key decision points
Swinging Bridge - Turnaroundkm 21
- No supplies, timing only.
- A heavy leg is next: 5.5 km with 538 m of climbing.
- The climb starts immediately on exit (27%); keep the stop short.
Deadwood - 2km 27
- Collect food and fluids and leave within 60-90 seconds.
- The heaviest leg is next: 9.4 km with 557 m of climbing.
- Cut-off: 23h 30m after the start.
Michigan Bluffkm 36
- Collect food and fluids and leave within 60-90 seconds.
- Crew access is allowed here.
- A heavy leg is next: 9.6 km with 357 m of climbing.
- Cut-off: 31h 45m after the start.
Foresthillkm 46
- Take hot food you digest easily and top up fluids.
- Your drop bag waits here; work off your prepared list.
- Crew access is allowed here.
- Cut-off: 33h 30m after the start.
Cal 2km 59
- Take hot food you digest easily and top up fluids.
- A heavy leg is next: 15 km with 534 m of climbing.
Drivers Flatkm 74
- Take hot food you digest easily and top up fluids.
- Crew access is allowed here.
- A heavy leg is next: 13 km with 321 m of climbing.
- Cut-off: 39h after the start.
Cool - 1km 99
- Take hot food you digest easily and top up fluids.
- Your drop bag waits here; work off your prepared list.
- Crew access is allowed here.
- Cut-off: 44h after the start.
Cool - 2km 119
- Take hot food you digest easily and top up fluids.
- Your drop bag waits here; work off your prepared list.
- Crew access is allowed here.
- Cut-off: 48h after the start.
- The longest stretch between official aid stations runs from China Wall - Start (km 0) to Deadwood - 1 (km 16): 16 km, with 549 m of climbing in between. Top up at China Wall - Start and size what you carry to the expected duration and your own drinking rate.
- Drinks only, no food, at No Hands - 1 (km 94) and Coffer Dam - 1 (km 101) and 2 more. Loosen the flask caps on approach; with no queue, refill and leave in 20-30 seconds. Carry the food you will need from the previous station.
- Swinging Bridge - Turnaround (km 21) is a timing point only, with nothing on the table. Load up as you leave Deadwood - 1.
- Hot food is served at Foresthill (km 46) and Cal 2 (km 59) and 8 more. If your stomach and race plan call for it, make this a deliberate 3-5 minute stop; do not sit down simply because hot food is available. Restart gently and let your stomach settle before lifting the effort.
- Food is available at Deadwood - 1 (km 16) and Deadwood - 2 (km 27) and 1 more. Decide what you need before reaching the table; without a planned special task, collect food and fluids and leave within 60-90 seconds. Finish eating on the next calm, suitable section.
- Drop bags at Foresthill (km 46), Cool - 1 (km 99), and Cool - 2 (km 119). Write down the equipment and food you expect to replace before the race so the decision is already made when you arrive.
- Crew support is permitted only at Michigan Bluff (km 36), Foresthill (km 46), Drivers Flat (km 74), Cool - 1 (km 99), and Cool - 2 (km 119). This is not the same as a drop bag: plan equipment and food hand-offs around these stations, then verify wristband, bag and transport rules with the organiser.
- The last aid station is No Hands - 2 (km 154), leaving 7 km to the finish. After that you are on what you carry.
- The heaviest leg runs from Deadwood - 2 (km 27) to Michigan Bluff (km 36): 9 km with 557 m of climbing. Treat it as the slowest part of your day and get your food out before it.
- Medical support is available at China Wall - Start (km 0), Deadwood - 1 (km 16), Deadwood - 2 (km 27), Michigan Bluff (km 36), Foresthill (km 46), Cal 2 (km 59), Drivers Flat (km 74), Mammoth Bar (km 87), Confluence (km 93), Cool - 1 (km 99), Cool - 2 (km 119), Browns Bar - 1 (km 125), ALT (km 134), Browns Bar - 2 (km 144), and Downtown Auburn - Finish (km 160). If something is wrong with your feet or your stomach, deal with it there rather than pushing on.
- The climbing starts the moment you leave Swinging Bridge - Turnaround (km 21): the steepest roughly 250 m section averages 27%. Nothing is served at this point, so arrive already stocked from the previous aid station, then begin the climb under control.
- The overall cut-off is 59h, including all checkpoint stops. Build the plan around the official leg budgets below, not a flat-course average pace.
- Relative to distance and climbing, the tightest official time budget runs from Michigan Bluff (km 36) to Foresthill (km 46): the official time budget is 1h 45m for 10 km and 351 m of climbing. Station stops come out of that same budget, so do not enter the leg already behind schedule.
Official cut-off ladder
| Leg | Distance | D+ | Official time budget | Closes |
|---|---|---|---|---|
| Start → Deadwood - 2passes Deadwood - 1, Swinging Bridge - Turnaround, which has no time limit | 27 km | 1256 m | 23h 30m | start + 23h 30m |
| Deadwood - 2 → Michigan Bluff | 9.4 km | 557 m | 8h 15m | start + 31h 45m |
| Michigan Bluff → Foresthill | 9.6 km | 351 m | 1h 45m | start + 33h 30m |
| Foresthill → Drivers Flatpasses Cal 2, which has no time limit | 28 km | 758 m | 5h 30m | start + 39h |
| Drivers Flat → Mammoth Bar | 13 km | 405 m | 2h 30m | start + 41h 30m |
| Mammoth Bar → Cool - 1passes Confluence, No Hands - 1, which has no time limit | 12 km | 516 m | 2h 30m | start + 44h |
| Cool - 1 → Cool - 2passes Coffer Dam - 1, HiddenLoopPoint, Coffer Dam - 2, which has no time limit | 20 km | 541 m | 4h | start + 48h |
| Cool - 2 → ALTpasses Browns Bar - 1, which has no time limit | 16 km | 409 m | 3h 30m | start + 51h 30m |
| ALT → Downtown Auburn - Finishpasses Browns Bar - 2, No Hands - 2, which has no time limit | 26 km | 701 m | 7h 30m | start + 59h |
Budgets are derived from the cut-off times published by the organiser; they are not a personal finish estimate.
| Station | Km | From previous | Supplies | Medical | Crew | Cut-off |
|---|---|---|---|---|---|---|
| China Wall - Start | 0 | — | — | Yes | No | — |
| Deadwood - 1 | 16 | 16 | Food | Yes | No | — |
| Swinging Bridge - Turnaround | 21 | 5.6 | None | No | No | — |
| Deadwood - 2 | 27 | 5.5 | Food | Yes | No | Friday 11:30 |
| Michigan Bluff | 36 | 9.3 | Food | Yes | Yes | Friday 19:45 |
| ForesthillDrop bag | 46 | 9.6 | Hot food | Yes | Yes | Friday 21:30 |
| Cal 2 | 59 | 13 | Hot food | Yes | No | — |
| Drivers Flat | 74 | 15 | Hot food | Yes | Yes | Saturday 03:00 |
| Mammoth Bar | 87 | 13 | Hot food | Yes | No | Saturday 05:30 |
| Confluence | 93 | 5.7 | Hot food | Yes | No | — |
| No Hands - 1 | 94 | 1.2 | Drinks | — | — | — |
| Cool - 1Drop bag | 99 | 4.8 | Hot food | Yes | Yes | Saturday 08:00 |
| Coffer Dam - 1 | 101 | 2.6 | Drinks | — | — | — |
| HiddenLoopPoint | 105 | 3.1 | None | — | — | — |
| Coffer Dam - 2 | 109 | 4.1 | Drinks | — | — | — |
| Cool - 2Drop bag | 119 | 9.6 | Hot food | Yes | Yes | Saturday 12:00 |
| Browns Bar - 1 | 125 | 6.7 | Hot food | Yes | No | — |
| ALT | 134 | 8.8 | Hot food | Yes | No | Saturday 15:30 |
| Browns Bar - 2 | 144 | 10 | Hot food | Yes | No | — |
| No Hands - 2 | 154 | 9.8 | Drinks | — | — | — |
| Downtown Auburn - FinishDrop bag | 160 | 5.6 | Hot food | Yes | No | Saturday 23:00 |
Aid station details come from the list published by the organiser; confirm them at the official source before race day.
Plan your cutoffs for this course
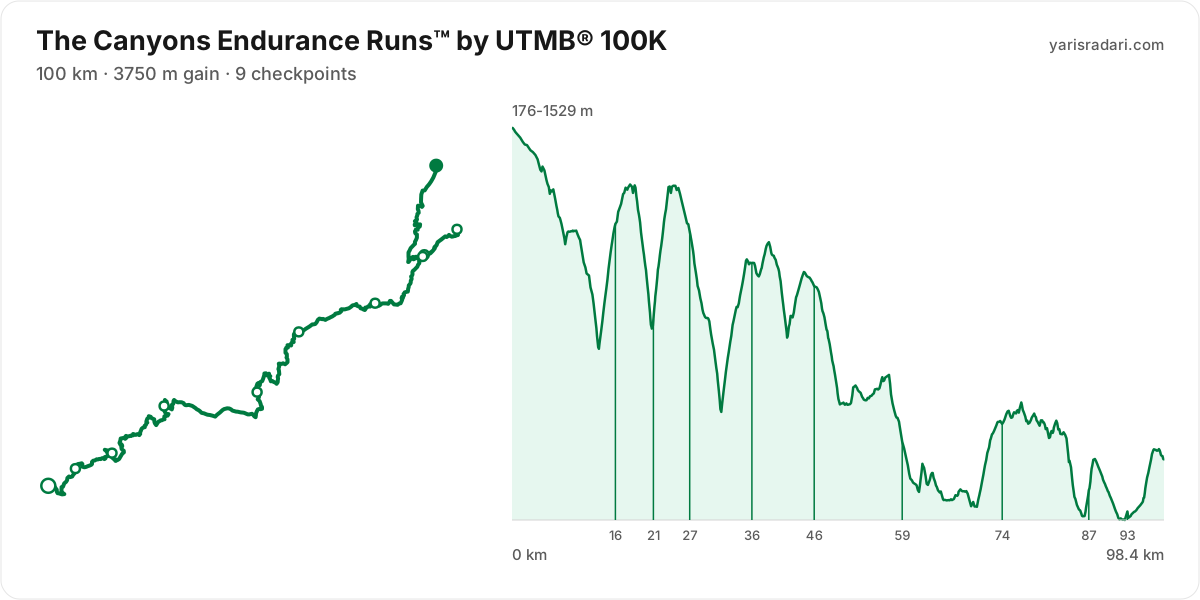
100K course98 km · 3743 m gain · 29% uphill · 9 aid stations
- Steep climb (10%+)
- Climb (3-10%)
- Flat
- Descent
- Steep descent (12%+)
The published GPX measures 98 km with 3743 m of climbing, 38 m per km. The course sits between 164 m and 1529 m of altitude. 58% of the gain sits in the first half.
- 0-16 km · Start → Deadwood - 1: 543 m up / 875 m down; the stretch descends.
- 16-21 km · Deadwood - 1 → Swinging Bridge - Turnaround: 206 m up / 537 m down; the stretch descends.
- 21-27 km · Swinging Bridge - Turnaround → Deadwood - 2: 501 m up / 191 m down; the stretch climbs.
- 27-36 km · Deadwood - 2 → Michigan Bluff: 557 m up / 670 m down; the stretch keeps rolling.
- 36-46 km · Michigan Bluff → Foresthill: 351 m up / 432 m down; the stretch keeps rolling.
- 46-59 km · Foresthill → Cal 2: 238 m up / 780 m down; the stretch descends.
- 59-74 km · Cal 2 → Drivers Flat: 520 m up / 452 m down; the stretch keeps rolling.
- 74-87 km · Drivers Flat → Mammoth Bar: 404 m up / 629 m down; the stretch descends.
- 87-93 km · Mammoth Bar → Confluence: 165 m up / 252 m down; the stretch keeps rolling.
- 93-98 km · Confluence → Finish: 261 m up / 71 m down; the stretch climbs.
The first 5 km drop 159 m. Fresh legs make it feel free, but you climb every metre of it back.
The climb between km 13 and km 18: 567 m over 4.8 km at 12% average, its steepest roughly 250 m section averaging 22%. Kilometre by kilometre: km 14 176 m, km 15 183 m, km 16 119 m, km 17 78 m, km 18 28 m. This is hiking terrain, not running terrain. Walk it with intent and keep your heart rate off the ceiling.
The steepest wall stands between km 21 and km 25: 494 m over 3.4 km at 15% average, its steepest roughly 250 m section averaging 27%. Kilometre by kilometre: km 22 202 m, km 23 179 m, km 24 127 m, km 25 24 m. Running is off the table only in the steepest roughly 250 m core; hike that part with short steps and run again once the grade eases.
The backbone of the course runs from km 31 to km 39: net 574 m over 7.3 km at 8% average, its steepest roughly 250 m section averaging 21%, 667 m of climbing in total with 93 m given back. Heaviest kilometres: km 33 168 m, km 34 117 m, km 35 114 m, km 32 89 m. Trying to run this costs far more than it saves. Shorten the stride, lean on the poles, keep moving.
The late climb from km 70 to km 77: net 358 m over 6.9 km at 5% average, its steepest roughly 250 m section averaging 14%, 412 m of climbing in total with 54 m given back. Heaviest kilometres: km 72 117 m, km 71 87 m, km 73 65 m, km 77 50 m. By the time you start it, about 70% of the day's climbing is behind you. At this point in the day most runners walk this gradient. Settle into a hiking rhythm and let the metres come.
The longest descent starts at km 0 and loses 755 m by km 13 at 6% average, its steepest roughly 250 m section averaging 24%. Its length can load the quads, so begin under control and build rhythm only when the ground and visibility allow it. The drop at km 18 averages 29% over its steepest roughly 250 m section; shorten the stride, stay balanced and set speed to the ground instead of braking continuously.
The last 6 km climb 243 m to the line. Know it going in and save something for it.
You reach the climb after Swinging Bridge - Turnaround with about 537 m of descent already in your quads; treat its first half as recovery effort.
The leg from Cal 2 to Drivers Flat is long and unsupported: 15 km and 520 m of climbing with no aid in between, so leave Cal 2 with full capacity.
- The organiser lists 100 km; the published GPX measures 98.4 km. The technical course notes use the published GPX measurement.
- Start 05:00, sunrise 06:15: the first 1 hour 15 minutes are run in the dark. The headtorch goes on your head at the start, not in your pack.
- Sunset is 19:47 and the finish cut-off is 01:00. A runner using the full time allowance spends the final 5 hours 13 minutes in darkness.
- Get the headtorch out before sunset and keep spare batteries or a power bank dry and immediately accessible. A spare buried at the bottom of the pack is not an emergency spare.
- Check reflective course markers regularly in the dark. If the markings disappear, stop moving forward, return to the last marker and confirm the route against the GPX or organiser app.
- Consider bringing poles. The course averages 38 m of gain per km and the longest climb averaging over 5% runs 7.3 km; if you have trained with them and the organiser allows them, use them on the climbs and stow them on runnable ground.
- 13% of the course is steep descent. Increase your cadence instead of braking, or your quads go early.
- Point to point: the finish sits 44.1 km from the start as the crow flies. Sort the shuttle and your drop bag before race day.
- Km 21.4 to 24.2 is the same ground you covered at km 20.9; note your pace on the first pass and use it as the yardstick on the second.
Course-profile notes are generated from GPX grade data; terrain, rules, aid stations and weather are added only when separately sourced.
Aid stations
Key decision points
Swinging Bridge - Turnaroundkm 21
- No supplies, timing only.
- A heavy leg is next: 5.5 km with 536 m of climbing.
- The climb starts immediately on exit (27%); keep the stop short.
Deadwood - 2km 27
- Collect food and fluids and leave within 60-90 seconds.
- The heaviest leg is next: 9.4 km with 542 m of climbing.
- Cut-off: 13h 30m after the start.
Michigan Bluffkm 36
- Collect food and fluids and leave within 60-90 seconds.
- Crew access is allowed here.
- A heavy leg is next: 9.6 km with 351 m of climbing.
- Cut-off: 7h 45m after the start.
Foresthillkm 46
- Take hot food you digest easily and top up fluids.
- Your drop bag waits here; work off your prepared list.
- Crew access is allowed here.
- Cut-off: 9h 30m after the start.
Cal 2km 59
- Take hot food you digest easily and top up fluids.
- A heavy leg is next: 15 km with 521 m of climbing.
Drivers Flatkm 74
- Take hot food you digest easily and top up fluids.
- Crew access is allowed here.
- A heavy leg is next: 13 km with 310 m of climbing.
- Cut-off: 14h 45m after the start.
- The longest stretch between official aid stations runs from China Wall - Start (km 0) to Deadwood - 1 (km 16): 16 km, with 535 m of climbing in between. Top up at China Wall - Start and size what you carry to the expected duration and your own drinking rate.
- Swinging Bridge - Turnaround (km 21) is a timing point only, with nothing on the table. Load up as you leave Deadwood - 1.
- Hot food is served at Foresthill (km 46) and Cal 2 (km 59) and 3 more. If your stomach and race plan call for it, make this a deliberate 3-5 minute stop; do not sit down simply because hot food is available. Restart gently and let your stomach settle before lifting the effort.
- Food is available at Deadwood - 1 (km 16) and Deadwood - 2 (km 27) and 1 more. Decide what you need before reaching the table; without a planned special task, collect food and fluids and leave within 60-90 seconds. Finish eating on the next calm, suitable section.
- Drop bag at Foresthill (km 46). Write down the equipment and food you expect to replace before the race so the decision is already made when you arrive.
- Crew support is permitted only at Michigan Bluff (km 36), Foresthill (km 46), and Drivers Flat (km 74). This is not the same as a drop bag: plan equipment and food hand-offs around these stations, then verify wristband, bag and transport rules with the organiser.
- The last aid station is Confluence (km 93), leaving 7 km to the finish. After that you are on what you carry.
- The heaviest leg runs from Deadwood - 2 (km 27) to Michigan Bluff (km 36): 9 km with 542 m of climbing. Treat it as the slowest part of your day and get your food out before it.
- Medical support is available at China Wall - Start (km 0), Deadwood - 1 (km 16), Deadwood - 2 (km 27), Michigan Bluff (km 36), Foresthill (km 46), Cal 2 (km 59), Drivers Flat (km 74), Mammoth Bar (km 87), Confluence (km 93), and Downtown Auburn - Finish (km 99). If something is wrong with your feet or your stomach, deal with it there rather than pushing on.
- The climbing starts the moment you leave Swinging Bridge - Turnaround (km 21): the steepest roughly 250 m section averages 27%. Nothing is served at this point, so arrive already stocked from the previous aid station, then begin the climb under control.
- The overall cut-off is 20h, including all checkpoint stops. Build the plan around the official leg budgets below, not a flat-course average pace.
- Relative to distance and climbing, the tightest official time budget runs from Michigan Bluff (km 36) to Foresthill (km 46): the official time budget is 1h 45m for 10 km and 351 m of climbing. Station stops come out of that same budget, so do not enter the leg already behind schedule.
Official cut-off ladder
| Leg | Distance | D+ | Official time budget | Closes |
|---|---|---|---|---|
| Start → Deadwood - 2passes Deadwood - 1, Swinging Bridge - Turnaround, which has no time limit | 27 km | 1251 m | 13h 30m | start + 13h 30m |
| Deadwood - 2 → Michigan Bluff | 9.4 km | 557 m | — | start + 7h 45m |
| Michigan Bluff → Foresthill | 9.6 km | 351 m | 1h 45m | start + 9h 30m |
| Foresthill → Drivers Flatpasses Cal 2, which has no time limit | 28 km | 758 m | 5h 15m | start + 14h 45m |
| Drivers Flat → Mammoth Bar | 13 km | 404 m | 2h 30m | start + 17h 15m |
| Mammoth Bar → Downtown Auburn - Finishpasses Confluence, which has no time limit | 12 km | 426 m | 2h 45m | start + 20h |
Budgets are derived from the cut-off times published by the organiser; they are not a personal finish estimate.
| Station | Km | From previous | Supplies | Medical | Crew | Cut-off |
|---|---|---|---|---|---|---|
| China Wall - Start | 0 | — | — | Yes | No | — |
| Deadwood - 1 | 16 | 16 | Food | Yes | No | — |
| Swinging Bridge - Turnaround | 21 | 5.6 | None | No | No | — |
| Deadwood - 2 | 27 | 5.5 | Food | Yes | No | Saturday 18:30 |
| Michigan Bluff | 36 | 9.3 | Food | Yes | Yes | Saturday 12:45 |
| ForesthillDrop bag | 46 | 9.6 | Hot food | Yes | Yes | Saturday 14:30 |
| Cal 2 | 59 | 13 | Hot food | Yes | No | — |
| Drivers Flat | 74 | 15 | Hot food | Yes | Yes | Saturday 19:45 |
| Mammoth Bar | 87 | 13 | Hot food | Yes | No | Saturday 22:15 |
| Confluence | 93 | 5.7 | Hot food | Yes | No | — |
| Downtown Auburn - FinishDrop bag | 99 | 6.5 | Hot food | Yes | No | Sunday 01:00 |
Aid station details come from the list published by the organiser; confirm them at the official source before race day.
Plan your cutoffs for this course
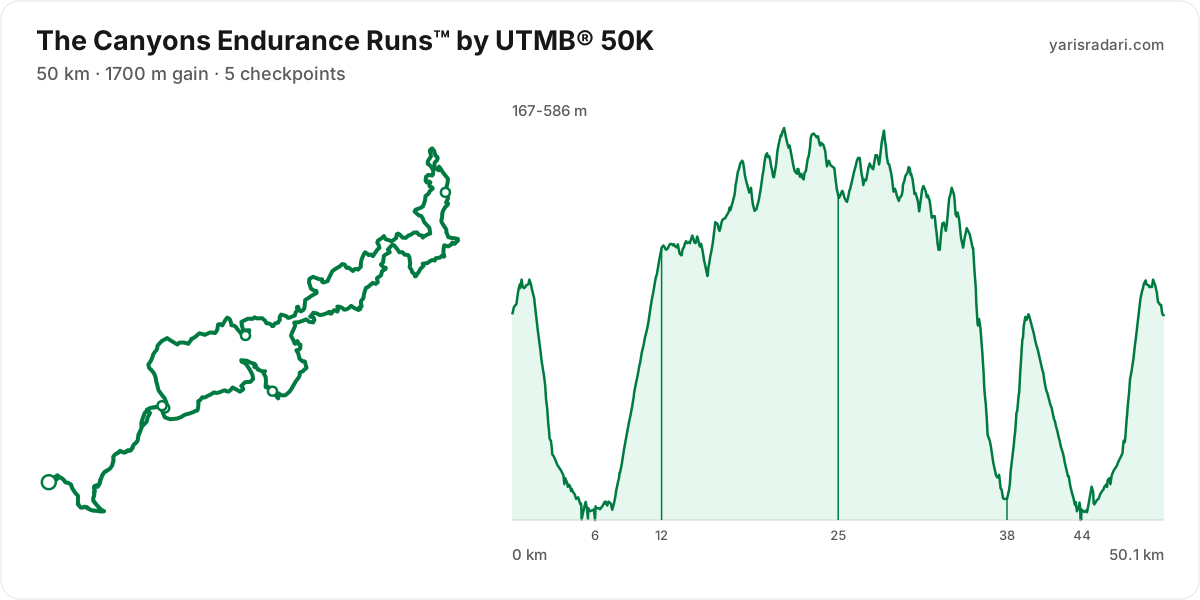
50K course50 km · 1590 m gain · 32% uphill · 5 aid stations
- Steep climb (10%+)
- Climb (3-10%)
- Flat
- Descent
- Steep descent (12%+)
The published GPX measures 50 km with 1590 m of climbing, 32 m per km. The course sits between 164 m and 586 m of altitude. 47% of the gain sits in the first half.
- 0-6.4 km · Start → Confluence - 1: 98 m up / 303 m down; the stretch descends.
- 6.4-12 km · Confluence - 1 → Clementine: 295 m up / 20 m down; the stretch climbs.
- 12-25 km · Clementine → Drivers Flat: 360 m up / 301 m down; the stretch keeps rolling.
- 25-38 km · Drivers Flat → Mammoth Bar: 317 m up / 643 m down; the stretch descends.
- 38-44 km · Mammoth Bar → Confluence - 2: 237 m up / 247 m down; the stretch keeps rolling.
- 44-50 km · Confluence - 2 → Finish: 286 m up / 77 m down; the stretch climbs.
The first 4 km drop 210 m. Fresh legs make it feel free, but you climb every metre of it back.
The backbone of the course runs from km 6 to km 21: net 417 m over 15 km at 3% average, its steepest roughly 250 m section averaging 9%, 618 m of climbing in total with 201 m given back. Heaviest kilometres: km 9 76 m, km 11 75 m, km 10 74 m, km 16 60 m. Runnable, but this is where a race gets thrown away one gear too hard.
The steepest wall stands between km 38 and km 39: 195 m over 1.3 km at 15% average, its steepest roughly 250 m section averaging 19%. By the time you start it, about 67% of the day's climbing is behind you. At this point in the day most runners walk this gradient. Settle into a hiking rhythm and let the metres come.
The late climb from km 44 to km 49: 248 m over 4.5 km at 6% average, its steepest roughly 250 m section averaging 15%. Kilometre by kilometre: km 45 33 m, km 46 24 m, km 47 41 m, km 48 116 m, km 49 58 m. By the time you start it, about 82% of the day's climbing is behind you. Running this gradient this deep into the race costs more than it gains. Hike it with short steps and save the running for the finish.
The longest descent starts at km 29 and loses 389 m by km 38 at 4% average, its steepest roughly 250 m section averaging 20%. Its length can load the quads, so begin under control and build rhythm only when the ground and visibility allow it. The drop at km 1 averages 17% over its steepest roughly 250 m section; shorten the stride, stay balanced and set speed to the ground instead of braking continuously.
The last 6 km climb 247 m to the line. Know it going in and save something for it.
A steep pitch starts within about 0.3 km of Mammoth Bar; keep the stop short and do not enter it on cooled-down legs.
- The organiser lists 1700 m of climbing; the published GPX measures 1590 m. The technical course notes use the published GPX measurement.
- Even at cut-off pace you finish 2 hours 48 minutes before sunset. This one is run entirely in daylight.
- Consider bringing poles. The course averages 32 m of gain per km and the longest climb averaging over 5% runs 4.5 km; if you have trained with them and the organiser allows them, use them on the climbs and stow them on runnable ground.
- Km 47.3 to 49.7 is the same ground you covered at km 2.8; note your pace on the first pass and use it as the yardstick on the second.
Course-profile notes are generated from GPX grade data; terrain, rules, aid stations and weather are added only when separately sourced.
Aid stations
Key decision points
Clementinekm 12
- Collect food and fluids and leave within 60-90 seconds.
- The heaviest leg is next: 14 km with 375 m of climbing.
- The longest unsupported stretch starts here: 14 km. Leave with full capacity.
Mammoth Barkm 38
- Collect food and fluids and leave within 60-90 seconds.
- A 19% pitch starts about 0.8 km after the station; do not enter it cooled down.
- The longest stretch between official aid stations runs from Clementine (km 12) to Drivers Flat (km 25): 14 km, with 375 m of climbing in between. Top up at Clementine and size what you carry to the expected duration and your own drinking rate.
- Food is available at Confluence - 1 (km 6) and Clementine (km 12) and 3 more. Decide what you need before reaching the table; without a planned special task, collect food and fluids and leave within 60-90 seconds. Finish eating on the next calm, suitable section.
- Crew support is permitted only at Downtown Auburn - Start (km 0) and Downtown Auburn - Finish (km 50). This is not the same as a drop bag: plan equipment and food hand-offs around these stations, then verify wristband, bag and transport rules with the organiser.
- The last aid station is Confluence - 2 (km 44), leaving 6 km to the finish. After that you are on what you carry.
- Another heavy leg runs from Drivers Flat (km 25) to Mammoth Bar (km 38): 13 km with 322 m of climbing. Treat it as the slowest part of your day and get your food out before it.
- Medical support is available at Downtown Auburn - Start (km 0), Confluence - 1 (km 6), Clementine (km 12), Drivers Flat (km 25), Mammoth Bar (km 38), Confluence - 2 (km 44), and Downtown Auburn - Finish (km 50). If something is wrong with your feet or your stomach, deal with it there rather than pushing on.
- About 0.8 km after Mammoth Bar (km 38), a roughly 250 m section averaging 19% begins. Choose food you know you digest easily and fill the bottles, then enter the climb at a controlled effort.
- The overall cut-off is 10h, including all checkpoint stops. Build the plan around the official leg budgets below, not a flat-course average pace.
| Station | Km | From previous | Supplies | Medical | Crew | Cut-off |
|---|---|---|---|---|---|---|
| Downtown Auburn - Start | 0 | — | — | Yes | Yes | — |
| Confluence - 1 | 6.4 | 6.4 | Food | Yes | No | — |
| Clementine | 12 | 5.1 | Food | Yes | No | — |
| Drivers Flat | 25 | 14 | Food | Yes | No | — |
| Mammoth Bar | 38 | 13 | Food | Yes | No | — |
| Confluence - 2 | 44 | 5.9 | Food | Yes | No | — |
| Downtown Auburn - FinishDrop bag | 50 | 6.5 | Hot food | Yes | Yes | Saturday 17:00 |
Aid station details come from the list published by the organiser; confirm them at the official source before race day.
Plan your cutoffs for this course
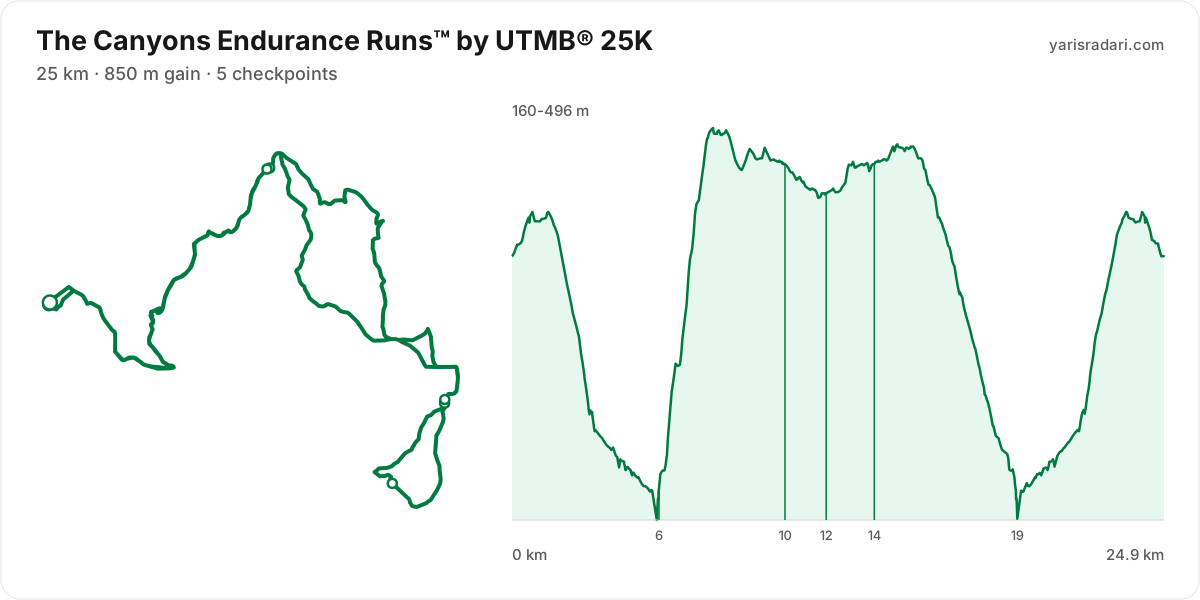
25K course25 km · 760 m gain · 17% uphill · 5 aid stations
- Steep climb (10%+)
- Climb (3-10%)
- Flat
- Descent
The published GPX measures 25 km with 760 m of climbing, 31 m per km. The course sits between 160 m and 496 m of altitude. 56% of the gain sits in the first half.
- 0-5.6 km · Start → No Hands - 1: 70 m up / 282 m down; the stretch descends.
- 5.6-10 km · No Hands - 1 → Cool - 1: 346 m up / 55 m down; the stretch climbs.
- 10-12 km · Cool - 1 → HiddenLoopPoint: 6 m up / 31 m down; close to flat.
- 12-14 km · HiddenLoopPoint → Cool - 2: 36 m up / 11 m down; close to flat.
- 14-19 km · Cool - 2 → No Hands - 2: 36 m up / 312 m down; the stretch descends.
- 19-25 km · No Hands - 2 → Finish: 268 m up / 68 m down; the stretch climbs.
The first 2 km drop 12 m. Fresh legs make it feel free, but you climb every metre of it back.
The backbone of the course runs from km 6 to km 8: 335 m over 2.1 km at 16% average, its steepest roughly 250 m section averaging 21%. Kilometre by kilometre: km 7 168 m, km 8 83 m. Running is not on the menu at this grade; settle into a hike from the bottom and load the poles, short steps.
The late climb from km 19 to km 23: 235 m over 3.9 km at 6% average, its steepest roughly 250 m section averaging 16%. Kilometre by kilometre: km 20 34 m, km 21 25 m, km 22 57 m, km 23 122 m. By the time you start it, about 66% of the day's climbing is behind you. At this point in the day most runners walk this gradient. Settle into a hiking rhythm and let the metres come.
The longest descent starts at km 15 and loses 295 m by km 19 at 7% average, its steepest roughly 250 m section averaging 10%. Its length can load the quads, so begin under control and build rhythm only when the ground and visibility allow it. The drop at km 1 averages 16% over its steepest roughly 250 m section; shorten the stride, stay balanced and set speed to the ground instead of braking continuously.
The last 3 km climb 162 m to the line. Know it going in and save something for it.
- Sunset is 19:48 and the finish cut-off is 21:00. A runner using the full time allowance spends the final 1 hour 12 minutes in darkness.
- Get the headtorch out before sunset and keep spare batteries or a power bank dry and immediately accessible. A spare buried at the bottom of the pack is not an emergency spare.
- Check reflective course markers regularly in the dark. If the markings disappear, stop moving forward, return to the last marker and confirm the route against the GPX or organiser app.
- Consider bringing poles. The course averages 31 m of gain per km and the longest climb averaging over 5% runs 3.9 km; if you have trained with them and the organiser allows them, use them on the climbs and stow them on runnable ground.
- A single loop: start and finish share the same spot. Around 24% of the ground is covered twice.
- Km 22.7 to 24.5 is the same ground you covered at km 2.1; note your pace on the first pass and use it as the yardstick on the second.
Course-profile notes are generated from GPX grade data; terrain, rules, aid stations and weather are added only when separately sourced.
Aid stations
Key decision points
No Hands - 1km 5.6
- Drinks only; arrive carrying your own food.
- The heaviest leg is next: 4.8 km with 360 m of climbing.
- A 21% pitch starts about 0.8 km after the station; do not enter it cooled down.
- Drinks only, no food, at No Hands - 1 (km 6) and No Hands - 2 (km 19). Loosen the flask caps on approach; with no queue, refill and leave in 20-30 seconds. Carry the food you will need from the previous station.
- HiddenLoopPoint (km 12) is a timing point only, with nothing on the table. Load up as you leave Cool - 1.
- Food is available at Cool - 1 (km 10) and Cool - 2 (km 14). Decide what you need before reaching the table; without a planned special task, collect food and fluids and leave within 60-90 seconds. Finish eating on the next calm, suitable section.
- Crew support is permitted only at Downtown Auburn - Start (km 0) and Downtown Auburn - Finish (km 25). This is not the same as a drop bag: plan equipment and food hand-offs around these stations, then verify wristband, bag and transport rules with the organiser.
- The last aid station is No Hands - 2 (km 19), leaving 6 km to the finish. After that you are on what you carry.
- The heaviest leg runs from No Hands - 1 (km 6) to Cool - 1 (km 10): 5 km with 360 m of climbing. Treat it as the slowest part of your day and get your food out before it.
- Medical support is available at Downtown Auburn - Start (km 0), Cool - 1 (km 10), Cool - 2 (km 14), and Downtown Auburn - Finish (km 25). If something is wrong with your feet or your stomach, deal with it there rather than pushing on.
- About 0.8 km after No Hands - 1 (km 6), a roughly 250 m section averaging 21% begins. Only drinks are served here, so fill the bottles and carry your own food in, then enter the climb at a controlled effort.
- The overall cut-off is 5h, including all checkpoint stops. Build the plan around the official leg budgets below, not a flat-course average pace.
- Relative to distance and climbing, the tightest official time budget runs from Start to Cool - 2 (km 14): the official time budget is 2h 45m for 14 km and 458 m of climbing. Station stops come out of that same budget, so do not enter the leg already behind schedule.
| Station | Km | From previous | Supplies | Medical | Crew | Cut-off |
|---|---|---|---|---|---|---|
| Downtown Auburn - Start | 0 | — | — | Yes | Yes | — |
| No Hands - 1 | 5.6 | 5.6 | Drinks | — | — | — |
| Cool - 1 | 10 | 4.8 | Food | Yes | No | — |
| HiddenLoopPoint | 12 | 1.6 | None | — | — | — |
| Cool - 2 | 14 | 1.6 | Food | Yes | No | Friday 18:45 |
| No Hands - 2 | 19 | 5.5 | Drinks | — | — | — |
| Downtown Auburn - FinishDrop bag | 25 | 5.7 | Hot food | Yes | Yes | Friday 21:00 |
Aid station details come from the list published by the organiser; confirm them at the official source before race day.
Plan your cutoffs for this course
Calculators for this race
Data sources: UTMB World Series, official site (canyons.utmb.world) · Last checked:
Tune-up races
Prep races you can run in the weeks before this one, ahead of your taper.
Similar races
Frequently asked questions
(35)
What is The Canyons Endurance Runs™ by UTMB®?
The Canyons Endurance Runs by UTMB® starts in the historic gold-rush town of Auburn, birthplace of mountain ultras, located in the northern California foothills of the Sierra Nevada range. This race is a qualifier for the iconic UTMB World Series Finals and the Western States Endurance Run. In addition, the Canyons 100K distance is a Western States 100 Super Golden Ticket race in which the top three female and male finishers earn direct entry to The Western States Endurance Run.
When is The Canyons Endurance Runs™ by UTMB® 2027?
The Canyons Endurance Runs™ by UTMB® takes place on Thu, Apr 22, 2027 - Sun, Apr 25, 2027. Start time: 12:00.
Where does The Canyons Endurance Runs™ by UTMB® take place?
The Canyons Endurance Runs™ by UTMB® takes place in Auburn, United States.
What are the courses and distances of The Canyons Endurance Runs™ by UTMB® 2027?
The Canyons Endurance Runs™ by UTMB® offers 4 courses: 161K (161 km, 5550 m D+); 100K (100 km, 3750 m D+); 50K (50 km, 1700 m D+); 25K (25 km, 850 m D+).
How hard is The Canyons Endurance Runs™ by UTMB® 2027?
Difficulty is measured in km-effort: distance plus ascent divided by 100. The 161K course covers 161 km with 5550 m of climbing, which is 217 km-effort and falls in ITRA category XXL. All courses: 161K 217 km-effort (XXL), 100K 138 km-effort (L), 50K 67 km-effort (S), 25K 34 km-effort (XS).
Is registration for The Canyons Endurance Runs™ by UTMB® 2027 open?
Registration appears to be open; the deadline is Sun, Apr 18, 2027.
When is the registration deadline for The Canyons Endurance Runs™ by UTMB® 2027?
The registration deadline for The Canyons Endurance Runs™ by UTMB® is Sun, Apr 18, 2027.
What is the official website of The Canyons Endurance Runs™ by UTMB®?
Official website: https://canyons.utmb.world/
Is the The Canyons Endurance Runs™ by UTMB® 2027 course a loop or an out and back?
The 161K course is point to point, finishing 44.1 km from the start; measured from the GPX file it runs 158.7 km. The 100K course is point to point, finishing 44.1 km from the start; measured from the GPX file it runs 98.4 km. The 50K course is a single loop with a shared start and finish; measured from the GPX file it runs 50.1 km.
Where is the hardest climb at The Canyons Endurance Runs™ by UTMB® 2027?
The biggest climb on the 161K course runs from km 32 to km 39: 7 km for 584 m at 8% average; its steepest roughly 250 m section averages 20%. It tops out at 1129 m.
How high does The Canyons Endurance Runs™ by UTMB® 2027 go?
The 161K course runs between 160 m and 1529 m with 5492 m of total climbing.
Do you need poles at The Canyons Endurance Runs™ by UTMB® 2027?
The 161K course averages 35 m of gain per km with a longest climb of 7 km, so poles help noticeably.
Do you need a headtorch at The Canyons Endurance Runs™ by UTMB® 2027?
161K: Sunset is 19:47 and the finish cut-off is 23:00. A runner using the full time allowance spends the final 10 hours 28 minutes in darkness. Get the headtorch out before sunset and keep spare batteries or a power bank dry and immediately accessible. A spare buried at the bottom of the pack is not an emergency spare. Check reflective course markers regularly in the dark. If the markings disappear, stop moving forward, return to the last marker and confirm the route against the GPX or organiser app. At cut-off pace you run into a second night. Plan the sleep question before race day: an hour gained on the first night costs two on the second.
What is the weather like at The Canyons Endurance Runs™ by UTMB® 2027?
Over the last 5 years the same week here measured 0°C to 13°C, with a high of 21°C, a low of -5°C and rain on 29% of days. A real forecast lands about two weeks out.
Where are the aid stations at The Canyons Endurance Runs™ by UTMB® 2027?
The 161K course has 19 stations; the first at km 16 and the last at km 154. The longest gap between them is 15 km, between Cal 2 and Drivers Flat.
What is served at the The Canyons Endurance Runs™ by UTMB® 2027 aid stations?
For the 161K course: Hot food: Foresthill (46. km), Cal 2 (59. km), Drivers Flat (74. km), Mammoth Bar (87. km), Confluence (93. km), Cool - 1 (99. km), Cool - 2 (119. km), Browns Bar - 1 (125. km), ALT (134. km), Browns Bar - 2 (144. km). Drinks only: No Hands - 1 (94. km), Coffer Dam - 1 (101. km), Coffer Dam - 2 (109. km), No Hands - 2 (154. km). No supplies at all: Swinging Bridge - Turnaround (21. km), HiddenLoopPoint (105. km).
Is there a drop bag at The Canyons Endurance Runs™ by UTMB® 2027?
Yes. On the 161K course the drop bag point is Foresthill (km 46).
What are the cut-off times for the 161K at The Canyons Endurance Runs™ by UTMB® 2027?
On the 161K course at The Canyons Endurance Runs™ by UTMB® 2027 the finish cut-off is Saturday 23:00. Intermediate cut-offs: Deadwood - 2 (km 27) Friday 11:30, Michigan Bluff (km 36) Friday 19:45, Foresthill (km 46) Friday 21:30, Drivers Flat (km 74) Saturday 03:00, Mammoth Bar (km 87) Saturday 05:30, Cool - 1 (km 99) Saturday 08:00, Cool - 2 (km 119) Saturday 12:00, ALT (km 134) Saturday 15:30.
What are the cut-off times for the 100K at The Canyons Endurance Runs™ by UTMB® 2027?
On the 100K course at The Canyons Endurance Runs™ by UTMB® 2027 the finish cut-off is Sunday 01:00. Intermediate cut-offs: Deadwood - 2 (km 27) Saturday 18:30, Michigan Bluff (km 36) Saturday 12:45, Foresthill (km 46) Saturday 14:30, Drivers Flat (km 74) Saturday 19:45, Mammoth Bar (km 87) Saturday 22:15.
What are the cut-off times for the 25K at The Canyons Endurance Runs™ by UTMB® 2027?
On the 25K course at The Canyons Endurance Runs™ by UTMB® 2027 the finish cut-off is Friday 21:00. Intermediate cut-offs: Cool - 2 (km 14) Friday 18:45.
What time does The Canyons Endurance Runs™ by UTMB® 2027 start?
Known start times: 161K 12:00, 100K 05:00, 50K 07:00, 25K 16:00, local time. Confirm against the organiser's schedule in race week.
What is the time limit at The Canyons Endurance Runs™ by UTMB® 2027?
The finish time limit is 161K Saturday 23:00, 100K Sunday 01:00, 25K Friday 21:00. Intermediate stations carry their own cut-offs; the full list is in the checkpoint table on this page.
Is there a GPX file for The Canyons Endurance Runs™ by UTMB® 2027?
Yes. The GPX files for the 161K, 100K, 50K, 25K courses can be downloaded from the course section on this page, next to the route and grade profile.
Which The Canyons Endurance Runs™ by UTMB® course should you choose?
The shortest option is 25K (25 km, 850 m D+) and the longest is 161K (161 km, 5550 m D+). With little trail experience the 25K is the safer start; the 161K demands an all-day effort and cut-off management.
What are the gradients like at The Canyons Endurance Runs™ by UTMB® 2027?
The 161K course averages 35 m of climbing per km, with 5492 m of total ascent and 6632 m of descent. The steepest kilometre averages 23%.
How runnable is the The Canyons Endurance Runs™ by UTMB® 2027 course?
Expect a mix of running and power hiking: 35 m of gain per km; hiking the long climbs is normal, and the longest climb runs 10.1 km.
Where is the steepest part of The Canyons Endurance Runs™ by UTMB® 2027?
The steepest kilometre of the 161K course averages 23% and sits inside the climb between km 21 and km 25.
How many climbs does The Canyons Endurance Runs™ by UTMB® 2027 have?
The 161K course has 16 distinct climbs. The biggest: km 32-39 (584 m at 8%); km 13-18 (567 m at 12%); km 21-25 (494 m at 15%).
Is there a long climb at The Canyons Endurance Runs™ by UTMB® 2027?
Yes. The longest climb runs 10.1 km from km 123, gaining 275 m at 3% average, topping out at 466 m.
What are the descents like at The Canyons Endurance Runs™ by UTMB® 2027?
There is 6632 m of descent in total. The longest drop runs 12.8 km between km 0 and km 13, losing 755 m.
Are there flat sections at The Canyons Endurance Runs™ by UTMB® 2027?
Partly: about 35% of the course is near flat, the rest climbs or descends.
Is the hard part of The Canyons Endurance Runs™ by UTMB® 2027 early or late?
The climbing is evenly split: 56% of it sits in the first half.
What is the elevation range at The Canyons Endurance Runs™ by UTMB® 2027?
The lowest point of the 161K course sits at 160 m and the highest at 1529 m, a range of 1369 m. Conditions change noticeably between the two, so plan clothing in layers.
Are poles mandatory at The Canyons Endurance Runs™ by UTMB® 2027?
The organiser has not announced a pole requirement. Based on the profile poles help noticeably.
Do you need to carry water at The Canyons Endurance Runs™ by UTMB® 2027?
Yes: the longest stretch without aid on the 161K course is 15.8 km, so carrying backup water is essential.